With only 4 ingredients and one pan needed, this decadent Oreo Icebox Cake is the perfect make-ahead treat! The rich vanilla whipped cream and chocolate cake-like layers together is incredible!
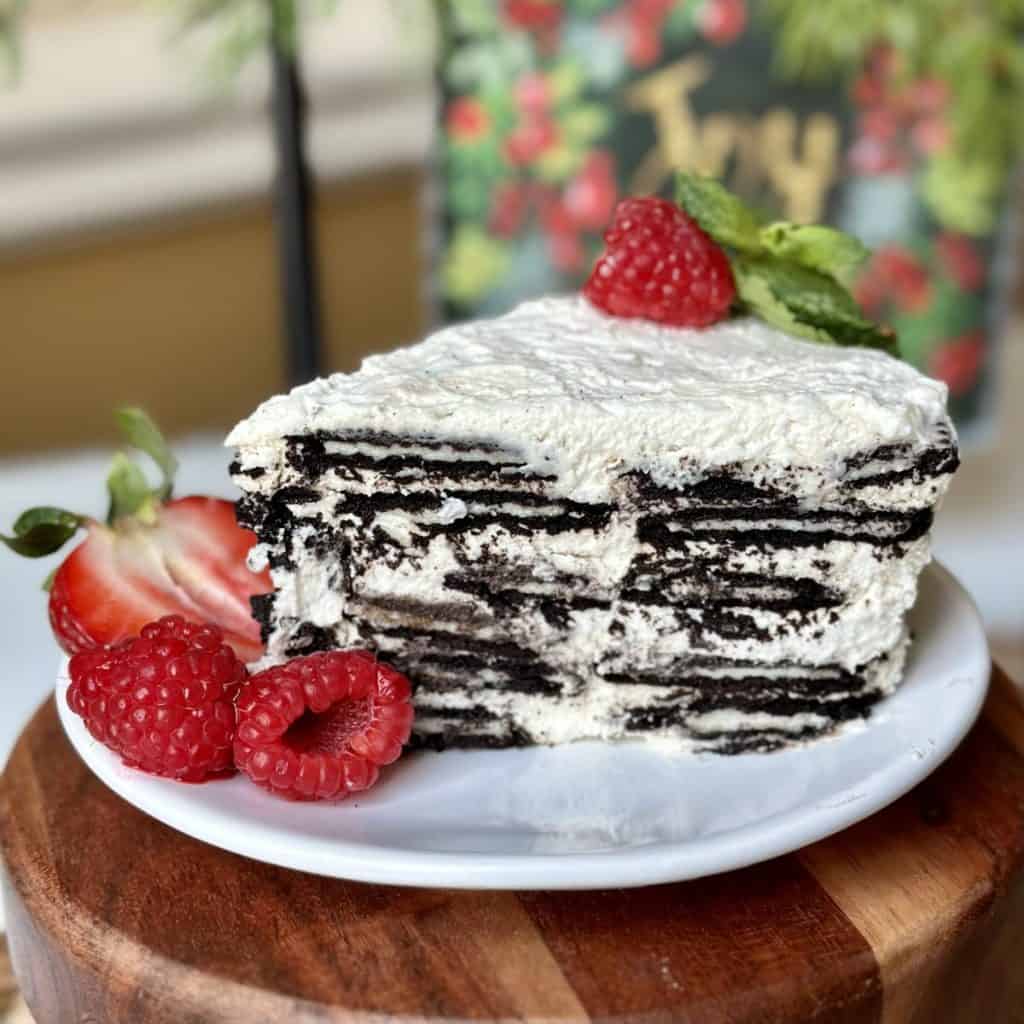
When the weather is warm or cold, and you're craving a sweet and refreshing dessert that requires minimal effort, look no further than the Oreo Icebox Cake. This delightful no-bake treat combines the classic flavor of Oreo Cookies with layers of fluffy whipped cream to create a creamy, dreamy dessert that's perfect for any occasion.
The fresh whipped cream elevates the richness and decadence of this pie, but if you want to save some time, you can substitute it with your favorite frozen whipped topping. The pop of fall
Save The Recipe!
Add your email below and we’ll send it straight to your inbox+ you’ll receive all our newest recipes!
Oreo Balls are another tasty treat! They’re made with Oreo, cream cheese, and white chocolate and oh-so delicious!
Table of Contents
Why You'll Love this Recipe
- Creamy and Dreamy: As this icebox cake with Oreos chills in the refrigerator, the layers meld together, creating a creamy and luscious texture that's incredible.
- Simple No Bake Cake: It's super easy to prepare. You don't need to turn on the oven or deal with complicated baking techniques. No bake desserts are a great option when you want a homemade dessert without the hassle of baking.
- Versatility: You can get creative by using various cookies and different flavored fillings and toppings.
- Make-Ahead: You can assemble the cake in advance and let it chill in the refrigerator until you're ready to serve, making it a convenient option for parties and gatherings.
Ingredients in No Bake Oreo Dessert
Scroll down for specific ingredient amounts in the recipe card.
- Heavy Whipping Cream: Provides the creamy and airy texture. The high fat content is responsible for the richness and luxuriousness of homemade whipped cream.
- Vanilla Extract or Vanilla Bean Paste: Imparts a pleasant vanilla flavor, enhancing the overall taste of the topping.
- Confectioners Sugar: Sweetens the whipped cream and dissolves easily in the cream.
- Oreo Thin Cookies: The primary base and flavor. Provides a satisfying crunch and texture to contrast with the creamy filling. As the cake chills, the cookies soften, creating layers reminiscent of cake.
- Optional Toppings: Whipped cream, Fresh Berries, Strawberry Glaze, Mint, Chocolate Sauce: Allows you explore your creativity and can make this dessert shine for any holiday or time of the year.
Tools You'll Need
How to Make Oreo Icebox Cake
- With a hand mixer or in a stand mixer fitted with a wire whip, whip heavy whipping cream, vanilla extract or paste and confectioners sugar on high speed until stiff peaks form. This should take about 2-3 minutes.
- Line a 10-inch round spring form pan or a loaf pan with plastic wrap. Add alternating layers of cookies and whipped cream, starting with cookies on the bottom. On the cookie layers, fill any gaps with broken up cookies to have one full layer as best as possible.
- Once the layers are complete, cover with plastic wrap and refrigerate at least 12 hours.
- When ready to serve your Oreo no bake dessert, remove the plastic wrap (and spring from pan if using) and transfer to a serving tray. Serve with your favorite toppings.
Tips and Substitutions
- Frozen whipped topping such as Cool Whip can be substituted for the whipped cream mixture in this recipe. Simply omit the heavy whipping cream, vanilla extract and confectioners sugar step and replace with 16 ounces of ready-made frozen whipped topping that has been thawed.
- For a twist, consider using different flavored Oreo cookies like mint, lemon peanut butter, or double-stuffed Oreos.
- Add a layer of crushed Oreo cookies between each layer of whipped cream for extra crunch.
- Drizzle chocolate syrup or caramel sauce over the top for a decadent touch.
- Experiment with different garnishes like chopped nuts, chocolate candies, a variety of berries or a drizzle or chocolate, caramel or melted peanut butter.
- Sprinkles are a sweet touch, but make sure to wait and add them when you're ready to serve as the colors might bleed into the whipped cream.
Storage and Freezing for Icebox Cake with Oreos
Leftover Oreo Icebox Cake should be stored in the refrigerator in an air-tight container. It's best enjoyed within 2-3 days to ensure the cookies maintain their desired texture and the whipped cream remains fresh.
FAQs
Yes! Simply omit the step of whipping together the heavy whipping cream, confectioners sugar and vanilla and use instead 16 ounces of Cool Whip that's been thawed.
Oreo icebox cake is not suitable for freezing. The freezing process can alter the texture and consistency of the cake, causing the cookies to become soggy when thawed.
To get that perfect slice, place the cake in the freezer for 30 minutes before slicing. Wipe the knife with a damp towel in between each slice.
There are lots of cookies that can be used in an icebox cake. They can change the entire flavor and feel of the dessert. Some excellent cookies that can be used are graham crackers, vanilla wafers, chocolate wafer, shortbread, chocolate chip, gingersnaps, peanut butter, lemon creme and coconut macarons.
You can use various types of pans or dishes to make an icebox cake, depending on your preference and the desired presentation. Some common options are a rectangular or square baking dish, round cake pan, trifle dish, loaf pan, miniature serving dishes and mason jars. If your pan chosen requires removing the dessert before slicing, line with plastic wrap before assembling for easy removal.
Try these other Dessert Recipes
- Chocolate Peanut Butter Dream Bars
- Chocolate Trifle Cake
- Chocolate Peanut Butter No Bake Cookies
- Brownie Pizza
- Banana Split Pie
Oreo Icebox Cake
Ingredients
- 2 cups heavy whipping cream
- 1 teaspoon vanilla extract or vanilla bean paste
- ¼ cup confectioners sugar
- 15 ounces Oreo Thin Cookies approximately 1 ½ packages
- Optional Toppings: additional whipped cream, fresh berries, strawberry glaze, mint, chocolate sauce
Instructions
- With a hand mixer or in a stand mixer fitted with a wire whip, whip heavy whipping cream, vanilla extract or paste and confectioners sugar on high speed until stiff peaks form. This should take about 2-3 minutes.
- Line a 10-inch round spring form pan or a loaf pan with plastic wrap. Add alternating layers of cookies and whipped cream, starting with cookies on the bottom. On the cookie layers, fill any gaps with broken up cookies to have one full layer as best as possible.
- Once the layers are complete, cover with plastic wrap and refrigerate at least 12 hours.
- When ready to serve, remove the plastic wrap and spring from pan and transfer to a serving tray. Serve with your favorite toppings.
Video
Notes
- Frozen whipped topping such as Cool Whip can be substituted for the whipped cream mixture in this recipe. Simply omit the heavy whipping cream, vanilla extract and confectioners sugar step and replace with 16 ounces of ready-made frozen whipped topping that has been thawed.
- For a twist, consider using different flavored Oreo cookies like mint, lemon peanut butter, or double-stuffed Oreos.
- Add a layer of crushed Oreo cookies between each layer of whipped cream for extra crunch.
- Drizzle chocolate syrup or caramel sauce over the top for a decadent touch.
- Experiment with different garnishes like chopped nuts, chocolate candies, a variety of berries or a drizzle or chocolate, caramel or melted peanut butter.
- Sprinkles are a sweet touch, but make sure to wait and add them when you're ready to serve as the colors might bleed into the whipped cream.







Leave a Reply